The theme behind what I would like to do during my Final Major Project will center around the subject of landscapes & nature, but I don’t just want to do pretty landscapes you find in the countryside, I want to do different kinds of landscapes likes cityscapes & possibly seascapes, looking at the differences between them. When I say nature I originally mean taking photographs of wildlife & even plant life, which I would most likely use my macro & telephoto lens for to get detail.
I want to produce around 4 final image presented in A2 size on MDF board of 12mm thickness, I will hang in one the exhibition wall for the end of year show with batons, so that the images do not look flat on the wall & stand out from the wall. When placed on show they will be in 2 rows of of 2 across my stretch of wall. My aim is to have 4 final photos, 1 landscape, 1 cityscape, 1 seascape & 1 cloudscape.
As the work is being presented in the end of year show, I need to buy A2 paper, which for 25 sheets alone costs £50, which is why I plan to share 1 pack with a classmate so I only have to pay £25 for half of the pack. I also need to think about the printing costs, unless I need to I don't want to have to print out more than I need as an A2 sheet in colour cost £1 per print. Then finally there's the MDF, which is apparently fairly cheap to have bought & cut down to the correct sizes, so in theory it shouldn't cost more than £20.
I have 1 main influences behind this idea for my FMP, Adam Ansel & his black & white landscape photography. Some ideas I do have are based on the times of day, for example I could go to the same location at different times of day & take the photos of what the places look like at certain times of the day.
Timescale:
Week 1 (16th-22nd April): Intro into project, ideas, FMP Plan, finding locations, possibly taking photos.
Week 2 (23rd-29th April): Research/blog, finding locations, taking photos, producing contact sheets.
Week 3 (30th April-6th May): Blog work, taking photos.
Week 4 (7th-13th May): Blog work, taking photos.
Week 5 (14th-20th May): Buying MDF board for mounting, taking photos if needed, editing photos.
Week 6 (21st-27th May): Final editing of photos, taking photos if needed, printing.
Week 7 (28th-31st May): Possible more final editing, final mounting to MDF board.
-------------------------------------------------------------------------------------------------------------------------------------------------------------
Research:
In
the bottom right hand corner of his painting, Turner painted a small
hare, running away from the train, over the years it has been
interpreted by several meanings, the main 2 meanings being that the hare
is either running in front of the train to suggest the limitations of
the new technology at the start of the industrial revolution, the other
to suggest that the hare is running away from the train in fear of the
new machinery & technology.
Claude Monet was the founder of Impressionism, the term being derived from his painting Impression, Sunrise. This relates to the time of day that I wish to take my photos, although instead of sunrises, I am photographing sunsets. "Landscape
is nothing but an impression, and an instantaneous one, hence this
label that was given us, by the way because of me." This
is what Monet explained his title behind his painting. I think it
explains how he created the art movement of Impressionism.
Location
Photography is based outside at a certain location rather than in a
studio at college. This type of photography is generally used for
landscape types of photography, but it is also used for wedding
photography & possible other types of portrait photography as well.
The main reason I am looking at location photography is because for my
final major project I will be shooting in locations that will relate to
my my idea, so my locations need to be in a place where the sky &
horizon is in clear view, as I am shooting sunsets.
------------------------------------------------------------------------------------------------------------------------------------------------------------
Possible Location Ideas:
For my idea I need to think of several places that I could go to to take my photo, the locations would depend on what type of landscape I wanted to base then on, so for example if I wanted a cityscape I would want to go somewhere high up enough to survey over the whatever town or city I would want in the photo. For landscapes I would go into places with nice looking countryside areas such as woodlands. Seascapes is most obvious when looking for locations, I would find a location by the sea or with a view of the sea. And as for cloud & skyscapes I would go somewhere with a clear view of the sky.
Cityscape Location Ideas:
Brighton from Racecourse - From the racecourse you can get some good views of parts of the city along the coast, but its a fair distance, so a telephoto lens may be needed. From here you can also get landscape photos of the surrounding countryside behinds Brighton on the Downs. This location is easily accessible to me, either by car or by bus.
Brighton from Wheel - From the Brighton Wheel you can get a lot more of a closer view of the city from above than you would from the racecourse, you could also get some seascape photos from there to with the piers in the background. This location is also easily accessible to me, more so by bus than car for this location though as its in the centre of town.
 Worthing from Multi-Storey Car parks - There are several multi-storey car parks in which I could choose from in Worthing, but I would need to chose one that I knew was quite high up so that I could see a majority of Worthing in the photo. Also depending on what car parks I could go to I could also get some seascape shots there too.
 London from London Eye - This would probably be one of the best options for cityscapes, seeing as London is the capital. From the London Eye you can see all over the city so there would probably be a variety of scenes you could shoot from up there. The only problem with this location is cost & time, it would cost a fair amount to get up there by train, as well as other train/tube fare to get there & probably somewhere between £10-£20 to pay for a ticket onto the Eye. For the timing I wouldn't be able to take photos at the time of day I want.
 Portsmouth from Spinnaker Tower - Like the London Eye it another good option for cityscapes as its a very high up location & you can see many areas of Portsmouth, but it has almost the same disadvantages as London as well with timing, the Spinnaker Tower would not be open past a certain time, so I would not be able to capture the sun setting across the city, as for the costs to get a train there & a ticket for the Spinnaker Tower, they would be considerably cheaper than going up to London.
 Landscape Location Ideas:
Shoreham Airport/A27/River Adur from Mill Hill - From Mill Hill on the Downs you can see for miles around, I've been there many times over the years, it was even one of the places where I did a shoot for my Contemporary Colour Project there. Its a particularly nice place to visit in the evenings, which is why I think it would be a good landscape to do a shoot at sunset.The easiest way to get there is by car, but if I wanted to go there on my own one evening than I would have to get a bus & walk up there or perhaps even cycle.
River Adur from Shoreham-by-Sea - The particular place I want to shoot for this by Adur Recreation Ground in Shoreham, you can get a good view of the river from here as it is right by it. If I shoot here the main element I want in the photo is the railway bridge that crosses the river & the hills behind it silhouetted & the sun reflected in the river as it sets. This is also very easily accessible by bus, & it doesn't take that long to reach there from where I live.
 Friston Forest - I don't believe I have ever been to Friston Forest, at least not that I know of, I've only seen what it looks like in photos, which is why I chose to this as a possible location to visit. Although it wouldn't be an traditional landscape from a high up point looking over some fields for example, it would create a nice setting for a photo, I would make sure I went on a day with good weather, as a forest in the rain may not look so good as it would in sunlight. The drawbacks with this though is that its only accessible by car & only one bus goes there. I would also have the problem of not be able to go there in the evening.
 Seascape Location Ideas:
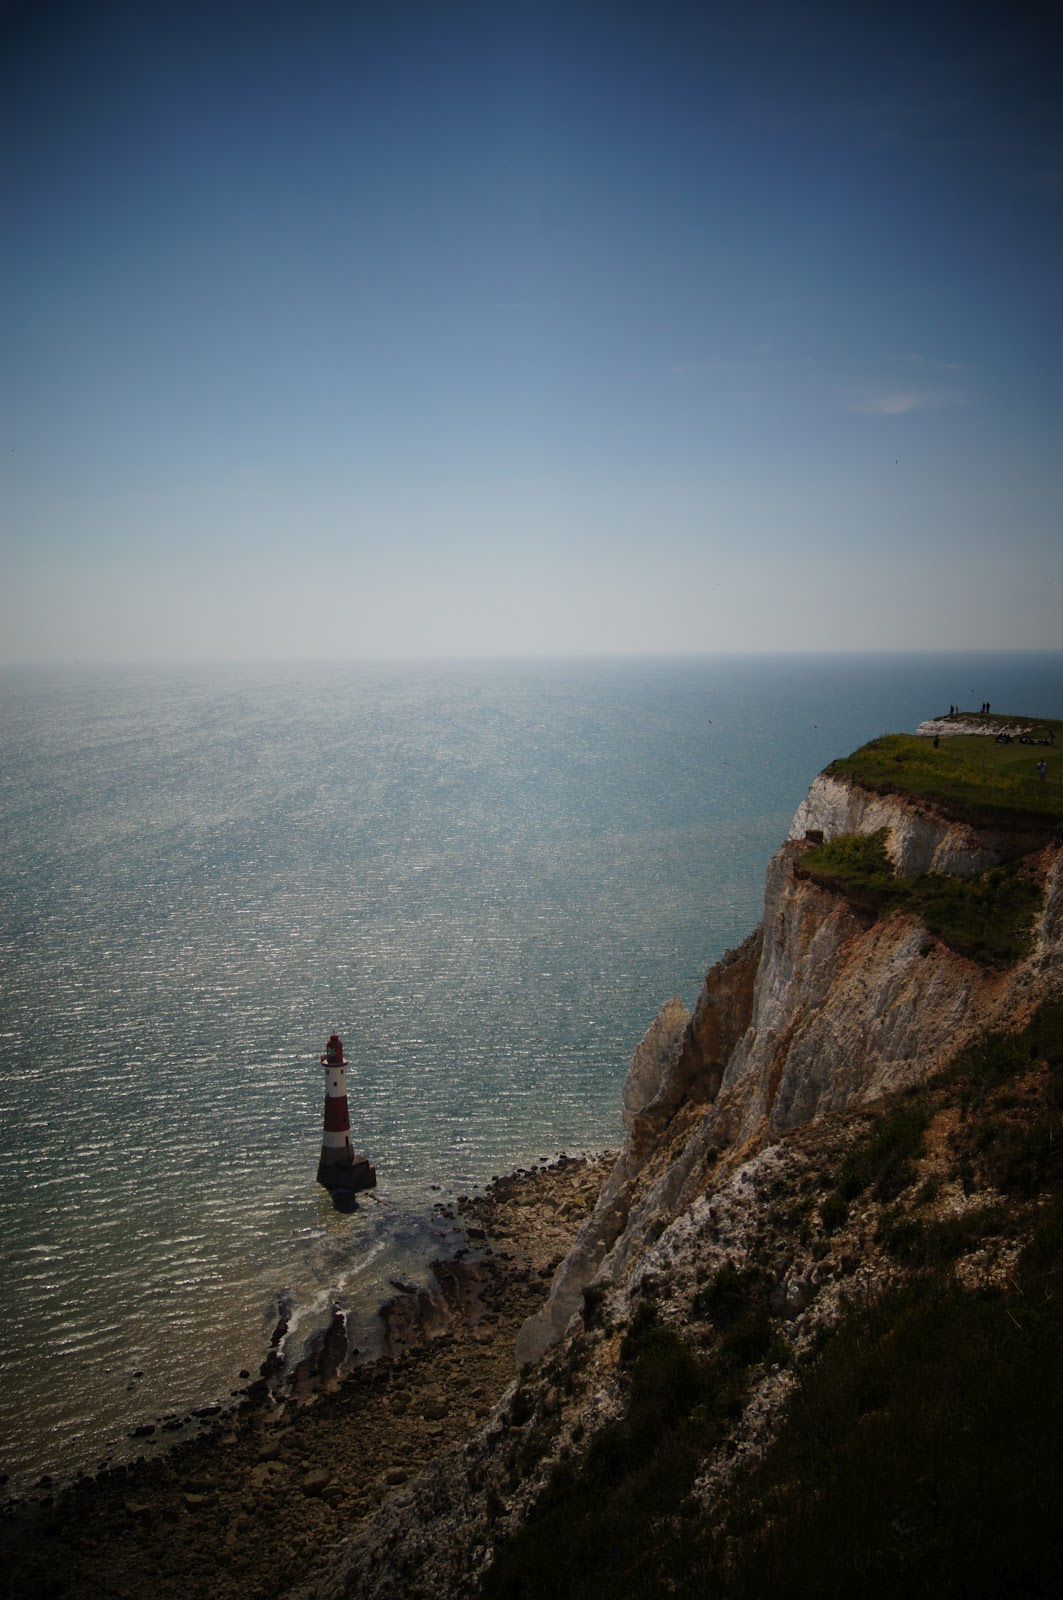
Beachy Head - Beachy Head is probably one of my more interesting ideas for locations for seascapes, the main thing I want if I go here is to get the lighthouse in the photo from the top of the cliff at beachy head, or if the time of day way right walk & get a photo of it from ground level, but the problem there would be that I would need to go at a specific time of day at low tide to get there. If I were to go to Beachy head I would try & go there on the same day as going to Friston Forest if I chose that as a location, as they are quite close to each other.
 Brighton/Hove Seafront - This is probably the easiest location to go to as it is near by & most easily accessible by public transport. The main area I think I would probably want shoot around is the West Pier, & I would most likely use a long exposure to blur the waves as they come up the beach, for this I would need my tripod as so the photo does not get blurred from the long exposure, I could also bring my remote timer shutter release so that I would not need to touch the camera which would also lead to camera shake.
 Cloud/Skyscape Location Ideas:
Rottingdean Windmill - The main idea behind this location is to get a silhouette of the windmill against the sun setting. Its a reasonably accessible place to get to, there are only a couple if buses that go there & then walk from the bus stop to the location. From this location you can also see over Brighton, which may be good for cityscapes, you can also see the sea, so it would be possible to get seascapes, but for that I would go down to Rottingdean Beach.
 Shoreham Power Station - This location had the same idea behind it as at Rottingdean Windmill, having the Power Station silhouetted against the sky whilst the sun sets. This is another reasonably accessible place to get to, either by bus or train from near where I live & then walk to the location. The possible problems with location though with restrictions around the area where the warehouses are.
 ------------------------------------------------------------------------------------------------------------------------------------------------------------
How To Prevent: Be safe around roadsides.
Risk: Falling Over. Location: Anywhere.
Likelihood: Depends on the location you are photographing, if in the countryside you could trip over a mound or something, or if your in an urban area you may trip on the pavement, so I would say 3, may happen.
Severity: That can also depend on circumstances, you may only trip & stumble back onto your feet or you may fall & break a limb, so I would say between 1-4, No Injury/ Very Minor Injury - Severe Injury.
Risk Assessment: 3x2.5=7.5, so the probability of this occurring is medium, but could be more or less.
How To Prevent: Wear suitable footwear (depending on locations) & look where you are going.
------------------------------------------------------------------------------------------------------------------------------------------------------------
-------------------------------------------------------------------------------------------------------------------------------------------------------------
Research:
Ansel Adams is probably one of the most known landscape
photographers in history, being well known for his sharp black &
white landscapes around America, most notably in the American West & Yosemite National Park. In terms
of my own project his work relates to the landscape side of the project
proposal. The Tetons and the Snake River is arguably one of his most popular American
West landscapes, there is a
wide variety
in the tonal range of this image, ranging from light greys to near blacks. If I
wanted a landscape with a good tonal range & high contrast like this if I
were using B&W film I would set a the filter in the darkroom to around 4 or
5 to get that good range of tones in the image.
 |
| The Tetons and the Snake River (1942), by Ansel Adams. |
Another of Adam's photographs that relates my FMP is his photograph of Tenaya Lake in Yosemite National Park.
It’s not just because
of
the landscape that I’m looking at this image, I’m also looking at the
sky &
the way that the clouds are presented in this image. They look very
dramatic in this photo, they stand out in the photo, this shoot could
have been a planned shot, i.e. Adams could have gone to this location on
a regular basis until the landscape looked how he wanted it to, or it
could have been the first time he went to this place.
 |
| Tenaya Lake, Yosemite National Park, California (1946) by Ansel Adams. |
The
one thing I would consider presenting my photos like Adams is to have
them in black & white, as his photos look spectacular to look at, I
could possibly make my own photos look more dramatic. However, even
though I would consider this with my different types of landscapes, as I
am taking them at sunset, I would prefer to capture them in colour.
J. M. W. Turner was a
British landscape painter, most commonly painting in the style of romanticism. His
work that relates to my FMP include his paintings during sunsets, which in
particular during the Industrial Revolution were symbolism for change in the
world, his most notable paintings for this was Rain, Steam and Speed – The Great Western Railway in which he
painted the newly invented Steam Engine traveling across the Maidenhead
Railway Bridge that was overlooking the east of London.
 |
| Rain, Steam and Speed - The Great Western Railway (circa 1844) by J. M. W. Turner. |
 |
| The Fighting Temeraire (circa 1838) by J. M. W. Turner |
In this painting we see the old war ship HMS Temeraire being pulled to its final resting place before being broken up & salvaged for other uses. Like Rain, Steam and Speed, The Fighting Temeraire also has a representation of the industrial revolution, with the tugboat pulling it to its final home in Rotherhithe in South East London,
the tugboat symbolises the changes of technology that the industrial
revolution brings with it, no more second-rate ships of the line. The
sunset painted into the image also represents change in the world, the
uprising of the industrial revolution, this is part of one of the
meanings that I want to symbolise in my photos, as in recent years we
have had several changes when it comes to technology, the invention of
the portable tablet computers for example.
Thomas Cole was an American Artist & Painter who is regarded as the man who founded the Hudson River School. He was most known for his realistic & detailed painting of the American wilderness & landscapes. His landscapes are what relate to my FMP, they are quite theatrical in terms the scenery, as they look like they are something from biblical times, as if God is controlling the weather, like in The Course of Empire: The Savage State.
In
this painting we can see on the left hand side there is a massive
storm, which looks as if the heavens have opened & God punishing
those who live on or near this land, yet on the right hand side, its a
bit less chaotic, the sky looks calmer, as well as the sea. What I would
take from this & put into my own project is to Photoshop a scene
like this, possibly make it look more modern, say in a city.
Thomas Cole was an American Artist & Painter who is regarded as the man who founded the Hudson River School. He was most known for his realistic & detailed painting of the American wilderness & landscapes. His landscapes are what relate to my FMP, they are quite theatrical in terms the scenery, as they look like they are something from biblical times, as if God is controlling the weather, like in The Course of Empire: The Savage State.
 |
| The Course of Empire: The Savage State (1836) by Thomas Cole |
 |
| Impression, Sunrise (circa 1872) by Claude Monet |
To
me I think the main meaning behind this painting is a new beginning, to
a new world, as this was just after the period in the uprising of the
Industrial Revolution. Aside from the sun rising, the main feature of
this painting is what appears to be a small rowing boat, & in the
background we can just make out what looks like smoke that is possibly
coming from chimneys from other larger boats or from on the land.
------------------------------------------------------------------------------------------------------------------------------------------------------------
Possible Location Ideas:
For my idea I need to think of several places that I could go to to take my photo, the locations would depend on what type of landscape I wanted to base then on, so for example if I wanted a cityscape I would want to go somewhere high up enough to survey over the whatever town or city I would want in the photo. For landscapes I would go into places with nice looking countryside areas such as woodlands. Seascapes is most obvious when looking for locations, I would find a location by the sea or with a view of the sea. And as for cloud & skyscapes I would go somewhere with a clear view of the sky.
Cityscape Location Ideas:
Brighton from Racecourse - From the racecourse you can get some good views of parts of the city along the coast, but its a fair distance, so a telephoto lens may be needed. From here you can also get landscape photos of the surrounding countryside behinds Brighton on the Downs. This location is easily accessible to me, either by car or by bus.
Brighton from Wheel - From the Brighton Wheel you can get a lot more of a closer view of the city from above than you would from the racecourse, you could also get some seascape photos from there to with the piers in the background. This location is also easily accessible to me, more so by bus than car for this location though as its in the centre of town.


Shoreham Airport/A27/River Adur from Mill Hill - From Mill Hill on the Downs you can see for miles around, I've been there many times over the years, it was even one of the places where I did a shoot for my Contemporary Colour Project there. Its a particularly nice place to visit in the evenings, which is why I think it would be a good landscape to do a shoot at sunset.The easiest way to get there is by car, but if I wanted to go there on my own one evening than I would have to get a bus & walk up there or perhaps even cycle.
River Adur from Shoreham-by-Sea - The particular place I want to shoot for this by Adur Recreation Ground in Shoreham, you can get a good view of the river from here as it is right by it. If I shoot here the main element I want in the photo is the railway bridge that crosses the river & the hills behind it silhouetted & the sun reflected in the river as it sets. This is also very easily accessible by bus, & it doesn't take that long to reach there from where I live.


Beachy Head - Beachy Head is probably one of my more interesting ideas for locations for seascapes, the main thing I want if I go here is to get the lighthouse in the photo from the top of the cliff at beachy head, or if the time of day way right walk & get a photo of it from ground level, but the problem there would be that I would need to go at a specific time of day at low tide to get there. If I were to go to Beachy head I would try & go there on the same day as going to Friston Forest if I chose that as a location, as they are quite close to each other.


Rottingdean Windmill - The main idea behind this location is to get a silhouette of the windmill against the sun setting. Its a reasonably accessible place to get to, there are only a couple if buses that go there & then walk from the bus stop to the location. From this location you can also see over Brighton, which may be good for cityscapes, you can also see the sea, so it would be possible to get seascapes, but for that I would go down to Rottingdean Beach.


Risk Assessment:
Risk assessment is quite important for shooting in certain locations I plan on shooting at. Although possible events in these locations are very unlikely to happen, its good to have a risk assessment to avoid the possibilities of them occurring at all.
Risk assessment is quite important for shooting in certain locations I plan on shooting at. Although possible events in these locations are very unlikely to happen, its good to have a risk assessment to avoid the possibilities of them occurring at all.
Risk Assessment Key:
Likelihood of Event Occurring: Severity:
1. Very Unlikely 1. No Injury/ Very Minor Injury
2. Unlikely 2. Minor Injury
3. May Happen 3. Injury
4. Likely 4. Severe Injury
5. Very Likely 5. Very Severe Injury - Risk of Death.
Likelihood: I would say this is at 2, unlikely, as where I plan to take the photos of the lighthouse at Beachy Head has fencing, although only a couple of metres up from there the fence ends & there's is just the cliff edge, the fencing is also not that high, so it could be a case of peering over the edge of the cliff & falling by accident or even the cliff edge giving way, both of which are still unlikely to happen.
Severity: Although occurrences such as these are unlikely to happen, the severity would be high at 5. Very Severe Injury - Risk of Death, as lets face it, its very unlikely for someone to survive a fall down a cliff.
Risk Assessment: 2x5=10, so the probability of this occurring is at a medium level.
1. Very Unlikely 1. No Injury/ Very Minor Injury
2. Unlikely 2. Minor Injury
3. May Happen 3. Injury
4. Likely 4. Severe Injury
5. Very Likely 5. Very Severe Injury - Risk of Death.
Assessment =
Likelihood x Severity:
Low = 1-6 Medium = 7-16 High = 17-25
Risk: Falling over edge of Cliff. Location: Beachy Head.Likelihood: I would say this is at 2, unlikely, as where I plan to take the photos of the lighthouse at Beachy Head has fencing, although only a couple of metres up from there the fence ends & there's is just the cliff edge, the fencing is also not that high, so it could be a case of peering over the edge of the cliff & falling by accident or even the cliff edge giving way, both of which are still unlikely to happen.
Severity: Although occurrences such as these are unlikely to happen, the severity would be high at 5. Very Severe Injury - Risk of Death, as lets face it, its very unlikely for someone to survive a fall down a cliff.
Risk Assessment: 2x5=10, so the probability of this occurring is at a medium level.
How To Prevent: Put basically, be sensible when photographing on cliffs.
Risk: Car Related Accident. Location: Anywhere.
Likelihood: The likelihood of this happening is at 2, unlikely, but depending on circumstances it could become likely.
Severity: The severity is hard to predict, say
if you were hit by a car traveling at a reasonably high speed for some
reason, it could be at 4 or 5, Severe Injuries, but it could be less,
which is why I will put it in the middle, at 3, Injury.
Risk Assessment: 2x3=6, so the probability of this occurring is low, although could be higher depending on circumstances. How To Prevent: Be safe around roadsides.
Risk: Falling Over. Location: Anywhere.
Likelihood: Depends on the location you are photographing, if in the countryside you could trip over a mound or something, or if your in an urban area you may trip on the pavement, so I would say 3, may happen.
Severity: That can also depend on circumstances, you may only trip & stumble back onto your feet or you may fall & break a limb, so I would say between 1-4, No Injury/ Very Minor Injury - Severe Injury.
Risk Assessment: 3x2.5=7.5, so the probability of this occurring is medium, but could be more or less.
How To Prevent: Wear suitable footwear (depending on locations) & look where you are going.
------------------------------------------------------------------------------------------------------------------------------------------------------------
Contact Sheets 01:


Images that came out well:

This photo was taken looking over Worthing on top of a multi-storey car park. The main reason I like the look of this photo is down to that the road is in the centre of photo, it gives a kind of symmetrical feel to the photo. Although it is not directly what I would call a cityscape as it is not shot in a city, to me a cityscape would need to have taller buildings on the horizon, & also possibly have the photo taken on a higher building to get a better look over the city. It would have been nicer to take this on a nicer day, but during these first couple of weeks of the projects it has been quite overcast weather, this, along with the location makes this photo look a little dull.

This is one of my favourites from the entire contact sheets, it was taken from a railway bridge down the road from my house whilst on a walk around the neighbourhood one evening. I thought this may be a good place to capture the sun setting as you can see a fair way from the bridge. Due to the season we cannot see the sun properly setting on the horizon as it is beyond the right side of the photo, however I think that the blue sky fading into orange behind those distinguishing clouds makes for a somewhat dramatic & romantic scene.

------------------------------------------------------------------------------------------------------------------------------------------------------------
Change In Idea:
After taking my photos on my first contact sheet, I've decided that now I want to focus more on the sky & clouds aspect of my original idea,I still plan on using the same idea to link them all together though, which was taking them at the same time of day, around sunset. So far my favourite images from my sky & clouds set are ones that have been taken over urban areas, usually looking over buildings etc., so I think I will stick with that idea, which leads to my predicted meaning to these photos, interpretation, as to different people, sunsets can mean different things, so for some it may be a calm or relaxing time of day, as the day is finished you can finally unwind, for others it can sadden them, but another meaning behind it could be change, as in recent years we have had several changes when it comes to technology, the invention of the portable tablet computers for example.
------------------------------------------------------------------------------------------------------------------------------------------------------------
Contact Sheet 02:


Contact Sheet 03:

For this shoot I visited Shoreham-by-Sea, it was to carry out one of the ideas I had when thinking of possible locations, in which I wanted to get photos of the sun setting behind the hills of the downs & the railway bridge that crosses the river Adur. I got a couple of fairly decent images from this shoot, including some photos of the climbing frame silhouetted in front of the orange sky. I liked some of photos, mainly the ones looking out over the river, my favourite of these being the photo below, I like this one as it was pretty much the photo I was aiming to take, with the sun about to set behind the hills of the Downs, some reflection of it in the river, with the bridge silhouetted against them, the only problem I have with these though is that there are no clouds, which has been one of the main features in my other photos.
 ------------------------------------------------------------------------------------------------------------------------------------------------------------
Final Images:
 |
| F/stop: f/5.6 - Shutter: 1/80 sec. |
 |
| F/stop: f/10 - Shutter: 1/125 sec. |
 |
| F/stop: f/5.6 - Shutter: 1/250 sec. |
-------------------------------------------------------------------------------------------------------------------------------------------------------------
Evaluation:
My Project Proposal has only been altered a small amount since it began, first starting out with wanting 4 different types of landscape for the final result & end of year show, which changed to just sky & cloudscapes. I found that over the course of the project the best way to capture photographs of this nature would be better in the light of dawn or dusk instead of in the middle of the day, as then the light may seem to harsh.
In the end, instead of having 4 photographs of the sun setting, I now have 3. The main reason for this is because of the weather, I know it sounds weird, but in the last week & half of the project, I found that the sunsets were not really what I was looking for, there were no dramatic clouds, just plain blue skies that faded to orange whilst the sun set, & also in the early weeks of the project it was near impossible to get photos of the sky & clouds due to the continuous rain we had in Sussex. But apart from the weather not being directly to my standards for my photos, I just think that these 3 photos looked a little better as a trio, by adding another photo it might spoil it by looking a little out of place, which is why I will probably not add another.
My favourite photo of this trio of photos is still of the jogger going up by Rottingdean Windmill. The only editing made to my photos on Photoshop was increasing the contrast to make the clouds appear more orange than they were originally, & to make the foreground more silhouetted against the sunset. In all 3 images there is at least one distinctive object that is part of the silhouette in the photo, in the first photo it is slightly hard to see but there's a pylon in the distance, in the second it would obviously be the windmill, & in the last what appears could be a radio or transmission tower.
If I had to criticise anything one this it would be that I could have to gone to a more of a variety of places to capture these sunsets, which could have lead to having 4 final pieces instead of just now 3. Also if the time of year had been right, say in the winter when it gets darker a lot earlier, i could have taken long exposure photographs of star trails in the night sky.
Overall I am happy at the way my project has turned out, I am glad i chose to display my images on A2 size paper, as I think A3 just would have been a little too small for my own liking.


